Using Arduino to process data from Geiger–Müller counters

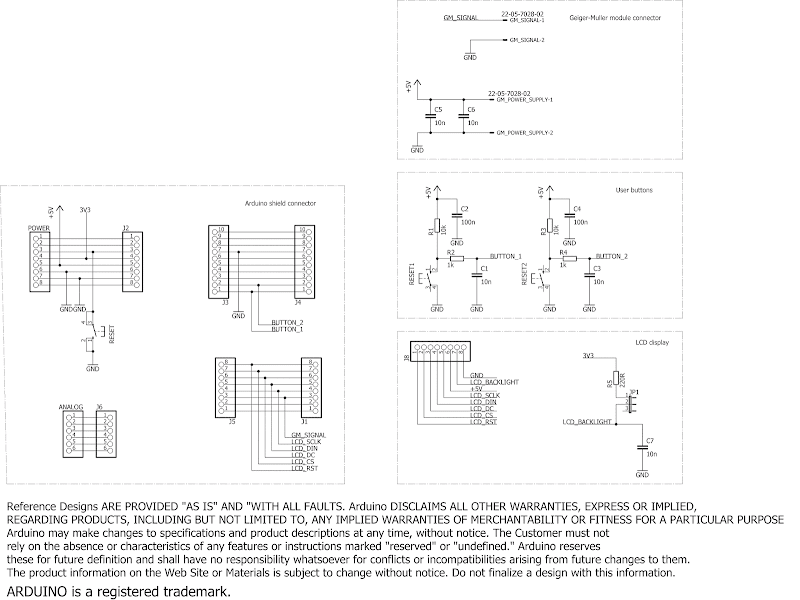
In the previous posts I've described a simple Geiger–Müller counter and various experiments with this device. Today I would like to present Arduino project to communicate with a Geiger-Muller counter, gather data and present it to the user. The device is based on Arduino Uno, Nokia 5110 LCD and homemade shield.

Currently it's possible to show two layouts: bar graph of the pulses in one minute interval and histogram of the gathered data. Both graphs are auto-ranging in Y axis. On the top of the pulse graph is visible also a numeric value of the last sample. The length of the histogram data is 4 minutes, the amount of bins is calculated automatically.

Below is visible layout with pulses per quant of time and histogram of them. You can clearly observe Gaussian distribution on the second image.

Hardware

I didn't want to place all of the connections and input PCB dimensions of a shield, so I've used as a base one of freely available shields and modified it to my needs - I've left the licence disclaimer unmodified. Unfortunately, I wrongly connected LCD, that's why the LCD looks like rotated 180 degrees. Anyway, it still works and I don't plan to make a new PCB to fix it.
I tried to make the code reusable in my other projects so the structure may look overcomplicated, but I think it's as it should be.

Software

Followed 3rd party librairies needs to be installed, to install them in Arduino IDE go to sketch -> Include Library -> Manage Libraries then type library name and proceed with installation.

  • Adafruit-GFX-Library
  • Adafruit-PCD8544-Nokia-5110-LCD-library
The main component is the GMCounter class that collects data in a circular buffer. I wanted to pass as an argument a size of the buffer, but also wanted to avoid using dynamic memory, finally I made this parameter an argument of template class, so now creating an object of this class looks like:
 static GMCounter<4 * 24> hourGMCounter;

This will create an object with this class with a buffer for 4*24 samples. I think, that it's quite cool.

There's a lot of commented out code in the main function, it was used to test parts of the program as it was developed. I didn't remove it because it still can be used if I will add new features.

Download.

The source code and Eagle files of the project is available on the GitHub, feel free to download and try it if you're interested in this area of physic.

How to check how many elements an array has?

In C it's possible to omit typing array size if it's fields are provided immediately, so the compiler can easily calculate the size by itself. This is presented below, note empty [] parenthesis.

    char* sampleArray[] = {
        "Hello world!",
        "How are you?",
        "You like coffe?"
    };

We can also specify the size directly:

    char* sampleArray[2] = {
        "Hello world!",
        "How are you?",
        "You like coffe?"
    };

Or use the best way:

    const int SampleArraySize = 2;

    char* sampleArray[SampleArraySize] = {
        "Hello world!",
        "How are you?",
        "You like coffe?"
    };

In the first two examples we don't have a variable that would tell us how many elements the array has. Sure, we may hardcode it, but it's not a good idea from a maintainability point of view.

We may calculate the size of above array by using a simple trick:

int sampleArrayLength = sizeof(sampleArray) / sizeof(sampleArray[0]);

Note that it will work with all built in types and if the size or even the type of an array will be changed in the future, this line will still be correct.

Below you may see a simple use case.

#include <stdio.h>


int main()
{
    char* sampleArray[] = {
        "Hello world!",
        "How are you?",
        "You like coffe?"
    };

    int sampleArrayLength = sizeof(sampleArray) / sizeof(sampleArray[0]);

    printf("someStrings array has %d  elments counting from one.\n", sampleArrayLength);

    for(int i = 0U; i < sampleArrayLength; i++)
    {
        printf("#%d element: %s\n", i, sampleArray[i]);
        
    }
    
    return 0;
}
sh-4.3$ main                                                                                                                                                                                                                                            
someStrings array has 3  elments counting from one.                                                                                                                                                                                                     
#0 element: Hello world!                                                                                                                                                                                                                                
#1 element: How are you?                                                                                                                                                                                                                                
#2 element: You like coffe?

Unfortunately, it will not work for arrays passed as pointers - for them, we need to pass size of an array as an additional argument.

How to check how many elements an enum has?

While C language doesn't offer build in method to check how many elements an enum has, it's still possible to obtain this information by using a simple trick.

The idea is to add a dummy element at the very end, since numeric enums values are 0, 1, 2, 3, 4, 5, ..., the numeric value of last element will be also the amount of elements that this enum has.

#include <stdio.h>

typedef enum Fruit {
    FRUIT_APPLE,
    FRUIT_ORANGE,
    FRUIT_BLACKBERRY,
    /* place new elements below */
    
    /* guard */
    FRUIT_LAST_ELEMENT
} Fruit;

int main()
{
    int fruitEnumLength = (FRUIT_LAST_ELEMENT - 1);
    printf("Fruit enum has %d elments counting from zero.\n", fruitEnumLength);

    return 0;
}
sh-4.3$ gcc -o main *.c                                                                                                                                                                                                                                 
sh-4.3$ main                                                                                                                                                                                                                                            
Fruit enum has 2 elments counting from zero.  

This technique may be useful for sanitizing input data or for writing tests.

Making your own PCB cleaner mixture

Commercial PCB washing solutions are relatively expensive, much cheaper and still powerful one can be prepared at home. It's based on trisodium phosphate, highly alkaline substance able to reduce oxides and react with grass forming soaps. Soaps in chemical meaning, not something we buy at store.

A sample PCB smashed into two pieces - on the left original state, on the right washed up.

DIY water based PCB solvent: before and after

Ingredients

The procedure is simple - a PCB is just placed into the solution and shaken from time to time to speed up the cleaning. Heating is not needed.

I'm using a cheap ultrasonic washing machine - I still don't know if it's working or if it's just a placebo and a bit of a noise, but it seems that at least it mix the water. I've placed the mixture into a glass and then placed it into the water in the washing machine. This is less efficient, but device is easier to clean after use.

DIY water based PCB solvent: ingredients

Note: trisodium phosphate is highly alkaline - it's visible on below below on below universal indicator. Use protective glasses and gloves.

In case of skin contact, wash the solution wash it with a lot of water. In case of a skin contact with the powdered substance whip it by using a rug and then wash it.

DIY water based PCB solvent: universal indicator

Trisodium phosphate was widely used till 70's, it's an inexpensive and effective cleaning agent, but is not environmental friendly.

Home-made mixture for chemical PCB tinning (alcaline bath)

Today I will present a method for PCB tinning that uses alkaline bath. What does alkaline bath mean? It says that the solution that we're using for tinning has this pH, in opposition acid bathes also exists - one of the example I presented in my previous post about PCB tinning at home.

This method is less expensive that the acid one, the results of both are comparable, but because of how a relatively dangerous alkaline bath is, I don't plan to use it. If you're searching a method to tin your PCBs, I would strongly suggest either using Lichtenberg's alloy (described here) or chemically tin them by using acid bath.

Ingredients:

Instead of pure metallic tin, a solder can be used, to increase its reactive surface, it can be melted on a small scrap of a laminate.

Note: NaOH is highly aggressive substance, it can easily permanently damage eyes or skin. Dissolution of an alcaline is strongly exothermic which means that water heats up, it can even start boiling and splashing dissolved NaOH!

Note: protective glasses and appropriate gloves should be used.

Note: don't use any containers, spoons or other small tools that you are also using for cooking, have a separate set for tinning.

PCB and tin (or mentioned above laminate) is placed in a high beaker. 100ml of water is added, then extremely slowly 1/2 teaspoon of NaOH and SnCl2 mixture is added. Mixture is heated (not boiled!) in heated bath similar to presented in this post. Tinning takes 10-20 minutes.

I haven't use polishing paste, so the surface isn't smooth and glossy, but technically it doesn't matter.

Solder wets surface very well, it's visible on below image.

To summarize, despite good results and low proce, I think that it's too dangerous to tin a PCB this way.

PCB tinning using Lichtenberg's alloy

The Lichtenberg's alloy is an interesting way of home PCB tinning - it's inexpensive and there is no need to polish cooper or use specialized tools and chemicals. The negative side is that the alloy is hard to obtain, fortunately it's not expensive. For some countries, it might not be possible at all to buy it.

The alloy contains 50% of bismuth, 30% of lead and 20% of tin, but what makes it interesting is that its melting point is 95-100°C. It means that it melts in boiling water - that's the idea if this technique.

Below you may see drops of The Lichtenberg's alloy.

We will need a couple of grams of the alloy, pan with lid, a tablespoon of citric acid, silicon spoon and old tweezers or similar tool.

  • Fill pan with tap water to 1/2 - 1/3 of volume, put inside the alloy and your PCB, cover the pan with lid to speed up heating.
  • When the water boils, use tweezers to immobilize the PCB - squeeze it to the pan. Dispatch alloy on whole copper surface by using a spoon. Put the lid again.
  • After a couple of minutes, immobilize the PCB again and by using a spoon, remove alloy excess from the PCB.
  • Clean the PCB in water, dry it by using a rag.

Citric acid is used here in two ways: as a flux and to decrease boiling temperature.

Note: don't use pans or spoons that you are also using for cooking, have a separate set for tinning. Please keep in mind that Lichtenberg's alloy contains lead, the method involves citric acid, a product of those (lead citrate) is (at least) unhealthy if digested.

Note: several similar alloys exists (e.g. Lipowitz's alloy), probably they could be also used, but always check theirs recipe. Especially make sure you don't use something that contains cadmium!

Note: don't spoil on your body any boiling water during above procedure.

Below is an example of a PCB tinned by using this method, it's a USB Li-Ion battery charger

If you liked this idea, you may also check the article about inexpensive chemical PCB tinning.

Home-made mixture for chemical PCB tinning (acid bath)

While it's possible to buy ready to use tinning formulas, making your own is much less expensive. Various recipes exist for tinning copper, today I will present a simple one that uses ingredients available at online chemical stores. It's one of acid bath methods.

Ingredients:

Simply put PCB into the solution and wait a couple of seconds, the more time the PCB is in the solution, the thicker a tin layer is. It's not needed to heat up the solution - room temperature is sufficient.

The substances are irritating, if you want to apply this method at home, please use gloves and store ingredients and mixture away from children.

The first PCB that I tinned this way is presented below. Solder wets the surface easily! Next time I will use polishing paste before tinning - this should help to obtain smooth and shiny surface.

Here is the device before testing it - it's a driver for a dosimeter based on DKP-50. Not the tidiest construction, but still looks nice.

In the next post I will present PCB tinning by using Lichtenberg alloy. You may also check related previous post about galvanic copper plating.