Showing posts with label C and C plus plus. Show all posts

Hat for Raspberry Pi to monitor environmental conditions (my sandbox for learning modern DevOps tools).

It’s 2024, and technologies from web development have made their way into the embedded world too-things like containerization, automated deployment, and more. This project is a small hat for the Raspberry Pi that gathers measurements for temperature, humidity, and air pressure. I created it as a learning tool to explore these concepts while using Docker, Ansible, and Grafana.

The picture below shows the hat. I thought it was so simple that I wouldn't make any mistakes during assembly, but, as usual, I did. The PCB turned out to be too long and collides with the USB port of the Raspberry Pi. That’s why I had to connect it using jumper wires. It works, but it doesn’t look very cool.

I didn’t choose these sensors for any particular reason—they were just parts I had on hand from the good pre-COVID times when software components and sensors were still cheap :)

The circuit is shown below. It consists of two sensors that communicate via I2C with the Raspberry Pi, along with a small LCD that also uses I2C. The LCD displays the measurement data as well.

Some people say that if your Raspberry Pi starts slowing down, it’s a sign that the SD card is about to fail, so it’s time to back up. I noticed mine was slowing down, checked the kernel logs, and everything looked fine, so I figured I was safe. The next day, the SD card was dead. So yeah, it’s definitely a good idea to back up in such cases.

This happened before I got into Docker and all the containerization stuff, so I was just developing scripts directly on the Raspberry Pi—and I think I lost them. It’s funny how I started this project to learn about containerization as a reliable way to deploy code, and I kicked things off with such a fail!

From the software point of view, the project will consist of three components:

  • Python software for gathering data from the sensors
  • InfluxDB for storing the measurements
  • Grafana for data analysis and presentation

I think each of these components will have its own Docker container. In addition, I’ve already created a Docker container for cross-compilation (since my PC has x86 architecture and the Raspberry Pi uses ARM architecture). It was quite a struggle to get that working. I plan to automate the installation using Ansible.

If you’re interested in the details, the full project is available on GitHub and Hackaday. Feel free to explore, make your own modifications, and maybe even improve on what I’ve done. And if you find it useful, don’t forget to share it!

Hardware Data Logger based on STM32 Nucleo and ESP Module

It's been a while since I last posted here, but here I am with something new. This project started when I was cleaning up the repo for a semiconductor radioactivity detector. For that project, I made a small shield for the STM32 Nucleo that included a button and a display.

It was used to present measurements in real time on the display and send them to a Raspberry Pi for further processing. I thought this could be turned into a separate project and reused, and I'll be presenting the results of that in this post. Here is the link to the GitHub of this new project that I describe in this post.

I started working on a new version and came up with these specs:

  • Keep the STM32 Nucleo as the main microcontroller
  • Add an ESP module for remotely uploading data to a Raspberry Pi or any other device
  • Use a much larger color display
  • Include four buttons for interacting with the device
  • Add 4 BNC connectors for gathering data from other devices
  • Include an SD card slot for local data storage
  • It also has a light sensor to dim the display at night.

The picture below shows the version that includes these specifications. Fun fact is that I traveled with this device in my carry-on luggage and was worried there might be issues at security, since it kind of looks like a movie bomb, but everything went fine.

Based on the that version, I created a dedicated PCB. I thought assembling the PCB would be pretty simple, but unfortunately, I forgot to buy all the components, which made it much harder than I expected. In this version, I used SMD female pins to connect to the Nucleo board. However, since I didn't have them on hand, I used THT pins instead. The footprint was different, and I didn’t solder them well, which put a lot of stress on the Nucleo board when connecting the shield.

It kept breaking repeatedly, and I didn’t expect such a small issue to cause so many problems. The LCD no longer works—probably something broke again—but the rest of the setup is functioning. In this version, the STM and ESP communicate with each other, but only in a limited way.

The device was designed in KiCad, and the circuit is shown below.

The firmware was developed using STM32CubeMX (for peripheral configuration), CMake, and C++17. I didn’t use anything from the standard library or dynamic memory allocation.

I’ve also included several tools for checking code quality: unit tests (Google Test, Google Mock), code coverage, static code analysis (cppcheck), and even dynamic code quality checks (which don’t make much sense in my case since I explicitly avoid using dynamic memory allocation, but I wasn’t thinking about that at the time). There are also Doxygen comments and coverage reports to flag any missing documentation.

I used ChatGPT (paid version) for most of this configuration. It’s amazing but can also help you quickly generate garbage. It speeds things up when you're headed in the right direction, but if you're doing something silly, it will just help you do it faster. You can check out how the CMake files are written in this project to get an idea of what I mean.

The current version is not finished, and I think I’ll abandon it in favor of a new version. I plan to drop the Nucleo board and place the STM chip directly on the PCB. This will solve the connector issues and make the device smaller and cheaper.

Another idea I have is to use some slots (similar to the ones used for connecting RAM to a PC motherboard, though I haven’t researched the names or footprints yet). This way, I could have one main PCB with the STM, ESP, display, etc., and use detachable boards for acquisition modules.

This is just the beginning, and there’s plenty of room for improvement. If you're curious to see where it goes, don't forget to watch or star the project on GitHub!

Ionization Chamber

An ionization chamber is a device used to measure radioactivity levels. When air atoms are hit by radioactive particles, an ion pair is produced. Ions have an electric charge, and if they are in an electric field created by positive and negative electrodes, negative ions will move toward the positive electrode, and positive ions will move toward the negative electrode. They will attempt to "meet each other," thereby creating a current. This current can be measured and is proportional to the number of ion pairs. The number of ion pairs is proportional to the radioactivity level.

The architecture of the device is presented below. It consists of an analog part and an STM8 microcontroller, which collects and sends measurements via UART. These measurements are collected on the Raspberry Pi side and processed using Python and R scripts. The results are stored as .csv files (raw data) or .png files (diagrams). While it would be possible to simplify this setup and eliminate the Raspberry Pi, I wanted to enable data collection and flashing of the microcontroller remotely, without needing to be physically near the device.

The outer electrode of the ionization chamber was made from PCB scraps and a copper plate, while the inner electrode was constructed using a few centimeters of non-enameled wire. To avoid electromagnetic interference, the amplifier was placed inside a metal chassis.

High voltage is required to create a sufficient electric field in the chamber. Initially, I was unsure of the exact voltage needed, so I added a simple DC/DC converter to the PCB to generate 400V DC. However, tests showed that 4x12V from batteries is sufficient. As a result, while the DC/DC converter is soldered onto the board (visible on the bottom left side of the picture), it is not in use.

The software was written in C and compiled using SDCC. A strange limitation of SDCC is that even if functions are unused, they are still compiled and included in the final binary. Since I am using StdPeriph as a HAL, there were many unused functions that occupied space. To work around this, I added #ifdef 0 ... #endif around each unused function, then attempted to compile and uncommented the functions that were actually needed.

The diagram below shows the results obtained from the device. As can be seen, the device is quite sensitive, capturing even small variations in the measurements.

For more details on the project, feel free to check out the full source code and documentation on GitHub. You can also follow the project's development and updates on Hackaday.

Weird arrays in C

Recently I've saw quite strange way to create an array in C. I will describe it bellow - looks quite interesting!

Let's assume we have an array given bellow:

int myArray[4];
We could rework it, so that each element is declared separately:
    int myArray0;
    int myArray1;
    int myArray2;
    int myArray3;

Now we can obtain pointer to first element and last element, and iterate through elements in between it as with regular array. We exploit that compiler will probably put those variables in the same order in the same place in memory.

A full example is given below:

#include <stdio.h>

void processElement(int e)
{
    printf("processing element in array, it has value %d\n", e);
}

int main()
{
    int myArray0 = 0;
    int myArray1 = 1;
    int myArray2 = 2;
    int myArray3 = 3;

    // dummy way to force compiler not to optimalize-out our array members
    printf("%d\n%d\n%d\n%d\n", &myArray0, &myArray1, &myArray2, &myArray3);

    int *start = &myArray0;
    int *stop = &myArray3;

    if(start > stop)
    {
        start = &myArray3;
        stop = &myArray0;
    }

    for(int* it= start; it <= stop; *it++)
    {
       processElement(*it);
    }
}

:)

Using Arduino to process data from Geiger–Müller counters

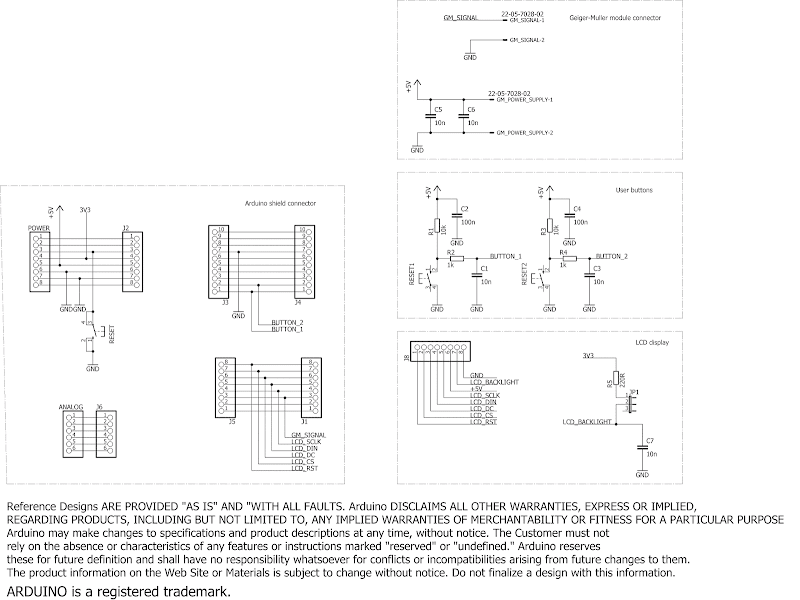
In the previous posts I've described a simple Geiger–Müller counter and various experiments with this device. Today I would like to present Arduino project to communicate with a Geiger-Muller counter, gather data and present it to the user. The device is based on Arduino Uno, Nokia 5110 LCD and homemade shield.

Currently it's possible to show two layouts: bar graph of the pulses in one minute interval and histogram of the gathered data. Both graphs are auto-ranging in Y axis. On the top of the pulse graph is visible also a numeric value of the last sample. The length of the histogram data is 4 minutes, the amount of bins is calculated automatically.

Below is visible layout with pulses per quant of time and histogram of them. You can clearly observe Gaussian distribution on the second image.

Hardware

I didn't want to place all of the connections and input PCB dimensions of a shield, so I've used as a base one of freely available shields and modified it to my needs - I've left the licence disclaimer unmodified. Unfortunately, I wrongly connected LCD, that's why the LCD looks like rotated 180 degrees. Anyway, it still works and I don't plan to make a new PCB to fix it.

I tried to make the code reusable in my other projects so the structure may look overcomplicated, but I think it's as it should be.

Software

Followed 3rd party librairies needs to be installed, to install them in Arduino IDE go to sketch -> Include Library -> Manage Libraries then type library name and proceed with installation.

  • Adafruit-GFX-Library
  • Adafruit-PCD8544-Nokia-5110-LCD-library
The main component is the GMCounter class that collects data in a circular buffer. I wanted to pass as an argument a size of the buffer, but also wanted to avoid using dynamic memory, finally I made this parameter an argument of template class, so now creating an object of this class looks like:
 static GMCounter<4 * 24> hourGMCounter;

This will create an object with this class with a buffer for 4*24 samples. I think, that it's quite cool.

There's a lot of commented out code in the main function, it was used to test parts of the program as it was developed. I didn't remove it because it still can be used if I will add new features.

Download.

The source code and Eagle files of the project is available on the GitHub, feel free to download and try it if you're interested in this area of physic.

How to check how many elements an array has?

In C it's possible to omit typing array size if it's fields are provided immediately, so the compiler can easily calculate the size by itself. This is presented below, note empty [] parenthesis.

    char* sampleArray[] = {
        "Hello world!",
        "How are you?",
        "You like coffe?"
    };

We can also specify the size directly:

    char* sampleArray[2] = {
        "Hello world!",
        "How are you?",
        "You like coffe?"
    };

Or use the best way:

    const int SampleArraySize = 2;

    char* sampleArray[SampleArraySize] = {
        "Hello world!",
        "How are you?",
        "You like coffe?"
    };

In the first two examples we don't have a variable that would tell us how many elements the array has. Sure, we may hardcode it, but it's not a good idea from a maintainability point of view.

We may calculate the size of above array by using a simple trick:

int sampleArrayLength = sizeof(sampleArray) / sizeof(sampleArray[0]);

Note that it will work with all built in types and if the size or even the type of an array will be changed in the future, this line will still be correct.

Below you may see a simple use case.

#include <stdio.h>


int main()
{
    char* sampleArray[] = {
        "Hello world!",
        "How are you?",
        "You like coffe?"
    };

    int sampleArrayLength = sizeof(sampleArray) / sizeof(sampleArray[0]);

    printf("someStrings array has %d  elments counting from one.\n", sampleArrayLength);

    for(int i = 0U; i < sampleArrayLength; i++)
    {
        printf("#%d element: %s\n", i, sampleArray[i]);
        
    }
    
    return 0;
}
sh-4.3$ main                                                                                                                                                                                                                                            
someStrings array has 3  elments counting from one.                                                                                                                                                                                                     
#0 element: Hello world!                                                                                                                                                                                                                                
#1 element: How are you?                                                                                                                                                                                                                                
#2 element: You like coffe?

Unfortunately, it will not work for arrays passed as pointers - for them, we need to pass size of an array as an additional argument.

How to check how many elements an enum has?

While C language doesn't offer build in method to check how many elements an enum has, it's still possible to obtain this information by using a simple trick.

The idea is to add a dummy element at the very end, since numeric enums values are 0, 1, 2, 3, 4, 5, ..., the numeric value of last element will be also the amount of elements that this enum has.

#include <stdio.h>

typedef enum Fruit {
    FRUIT_APPLE,
    FRUIT_ORANGE,
    FRUIT_BLACKBERRY,
    /* place new elements below */
    
    /* guard */
    FRUIT_LAST_ELEMENT
} Fruit;

int main()
{
    int fruitEnumLength = (FRUIT_LAST_ELEMENT - 1);
    printf("Fruit enum has %d elments counting from zero.\n", fruitEnumLength);

    return 0;
}
sh-4.3$ gcc -o main *.c                                                                                                                                                                                                                                 
sh-4.3$ main                                                                                                                                                                                                                                            
Fruit enum has 2 elments counting from zero.  

This technique may be useful for sanitizing input data or for writing tests.

Dangling else problem

What is a dangling else problem? It's presented below - what will print this program?

#include <iostream>

int main()
{
    bool a = true;
    bool b = false;
    
    if(a)
        if (b)
            std::cout << "foo" << std::endl;
    else
        std::cout << "bar" << std::endl;

   return 0;
}

It may seem that it won't print anything, but isn't true - on the screen we will see "bar". That's because the "else" is bound to the last "if" statement that wasn't already bound to other "else".

This may lead to bugs and confusion. One easy way is to always embrace body of the "if" statement in brackets. If we want to bind the "else" to the first "if" then correct parenthesis should be added as below:

    if(a)
    {
        if (b)
        {
            std::cout << "foo" << std::endl;
        }
    }
    else
    {
        std::cout << "bar" << std::endl;
    }

If we want to bound it to the second "if", it should be:

    if(a)
    {
        if (b)
        {
            std::cout << "foo" << std::endl;
        }
        else
        {
            std::cout << "bar" << std::endl;
        }
    }

What is good is that compilers will usually produce a warning in places where this error may exist:

 In function 'int main()':
8:7: warning: suggest explicit braces to avoid ambiguous 'else' [-Wparentheses]

More readable way of casting primitive types in C++

How to cast a variable of one primitive type to another? Usually people use static_cast operator, but it can be done in other, more readable way.

Below example demonstrate the problem, and two solutions:

char var1 = 3;
char var2 = 5;

// first way
int result1 = static_cast<int>(var1 + var2);

// second way
int result2 = int(var1 + var2);

The same trick may be used e.g. when passing to a function an argument of different type that expected.

There is also C-style casting available in C++, but I didn't mention it above because it's discouraged.

Yes, I know, casting from one type to another is a common source of bugs, and can signify that overall design could be improved. That's true, but sometimes it's inevitable.

A trip with Geiger Counter on the Śnieżka mountain

During the Second World War Nazis established a uranium mine in Krkonoše mountains. Extracted ore was used in a research facility in Oranienburg. After the war, the mine was in polish borders, but Poland was then a puppy country of the USSR, so the ore was still extracted, but now was transported to the USSR. Later the mine was used in civil research.

I've visited those mountains with my Geiger counter, not the mine, but still close - Śnieżka mountain.

My construction uses three GM tubes instead of one - that's why the amount of pulses per period of time is also three times bigger. Don't panic! :) In addition, even if radioactivity is a bit bigger that in (for example) my home in Wroclaw, it's still not hazardous for health.

As a reference, at home my Geiger Counter shows around 60 pulses per minute.

As you will see below results were bigger than those that I observe at home, is it due to the uranium ore that is near? Maybe, I'm not sure, I wasn't on any other mountains with my counter, so I can't verify it.

Preparations

32F429IDISCOVERY board is used to count pulses and show results, it requires 5V power supply, the same as my Geiger Counter. Both were supplied from DC/DC converter (the cheapest I could buy), and 3xAA NiCd batteries. In total 250-300mA was drained from the batteries.

Final adjustments of the latest HW version - as usual, I made mistakes during the design of the PCB.

Geiger Counter - last modification before a trip

ATtiny44 evaluation board for DYI robots

Intro

I will start from saying that the board could be replaced by any Arduino plus some(s) its motor driver shield(s). So why I made it you may ask? Well, while I made this tiny tank-robot model presented on below pictures, I wanted to make at least some things by myself, and decide what I need and how I need it instead of only buying prefabricated stuff.

This is the result, hope you will enjoy it and that maybe you will find inspirations for your own stuff.

Her's what it has and what it can..

  • Handle two separate motors, each can run either "forward", "backward", or stop.
  • Motors can be powered from a separate power source (there's a jumper for that, if removed, power is taken from a source connected to a separate goldpin)
  • ATtiny24 manages the board, it's relatively small microprocessor, but I think that it will be fine for such project. All its pins are available via goldpins, I also added a couple goldpins connected to Vcc and GND to make easier connection to other boards, shields and stuff like that.
  • To make programming easier, 6 PINs ISP socket for the ATtiny24 is also included.
  • ATtiny24 can be removed and the motor driver can be managed from external source, e.g. an Arduino. This could be useful in future if the ATtiny24 would not be sufficient.
  • There isn't any voltage regulator, or step/up/down/ converter because it would make the board less flexible.

Circuit

The circuit is simple, consists only of a small microprocessor, motor driver, some filtering capacitors and a lot off connectors.

The hardware was designed in Eagle, the board is available on GitHub.

Software

PB0, PB1, PB2 and PB3 ports of the ATtiny24 are used to drive the motor, others are available for other purposes, e.g to communicate with the sensors. There's not a lot of them left, because the microprocessor is quite small, but I think that for such project, it will be enough.

USB powered thermometer with an interesting data display

Almost each person interested in building electronic devices has built at least one thermometer and power supply in his life. I'm not different, to add to this, today I will present one of my thermometers.

Original concept was different, I wanted to use it as a weather station, wake up, go to my balcony, smoke a cigarette and check what on this device what is the temperature, humidity and air pressure. At the end I decided to build a small thermometer (in future with all mentioned features), that I could plug to my computer and check conditions in my home.

What is nice here is that the data is displayed original way, there are two rows of nine LEDs, if on the upper row second diode is on, and on the bottom row fifth diode is on, then the value presented by the device is 2*10 + 5 = 25. It can sounds complicated at first, but in practice it's fast and intuitive. Below is an example, value presented on the display is 25:

Popularne pytania z rozmów wstępnych dla programisty C/C++

W tym wpisie podzielę się zbiorem pytań, które często powtarzają się na różnych rozmowach wstępnych na stanowisko programisty C/C++. Są to pytania techniczne - nie opisałem tu żadnych pytań miękkich (HR'owych). Spotkałem się z nimi sam (już prawie 10 lat pracy, jak ten czas leci..), a niektóre zadawałem osobiście, gdy byłem po drugiej stronie stołu. Mam nadzieję, że taka lista okaże się pomocna podczas przygotowań do rozmowy.

Na początek pytania związane stricte z C/C++. Kolejność losowa.

  • Czym jest język obiektowy? Czy C++ jest językiem obiektowym (odpowiedź na to, czy jest może się różnić w zależności od tego, jak definiujemy język obiektowy)?
  • Napisz program, który jest poprawny składniowo w C, a nie jest w C++.
  • Czym są słowa kluczowe (w kontekście zmiennej, w kontekście metody) static i const? Co oznacza słowo kluczowe volatile?
  • Czym różni się alokacja pamięci na stosie od alokacji pamięci na stercie? Jak zmienną na oba sposoby? Kiedy stosować jedno, a kiedy drugie?
  • Czym jest smart pointer? Kiedy go stosować? Jakie są rodzaje?

Is it possible to write a program in C without using semicolons?

Yes, it's possible! In this text I will show a set of tricks to do it. I will present this on a simple program that that reads two numbers from STDIN and prints theirs sum to the STDOUT.

Normally I would start this program from declaring two variables:

int a, b;

Unfortunately, there's a semicolon at the end of the line. It can be omitted by using variables already declared for the main function:

int main(int argc, char* argv[])

I will use argc as a and argv[0] as b. Normally, next thing would be reading two values from STDIN and placing them in a and b variables. It could be like this:

scanf("%d%d", &a, &b);

Once again, there's a semicolon! This one can be skipped by using 'if' statement:

if (scanf("%d%d", &a, &b)) {}

The same trick can be used for printing to STDOUT:

if( printf("%d", a + b ) ){}

Above code compiles and works correctly, but normally the main function should return zero if everything went OK:

return 0;

This semicolon can't be avoided by using the trick with 'if' statement, but we other construction can help here:

if(brk(0)){}

That's all, below is full source code:

#include <stdio.h>
#include <unistd.h>

int main(int argc, char* argv[]) {
    if (scanf("%d%d", &argc, &argv[0])) {}
    if (printf("%d", argc+argv[0])) {}
    if (brk(0)) {}
}

Leave a comment, if you know other interesting riddles or tricks that can be used here!

Interesting way to check statuses returned by functions

If there is a set of bool functions, then sometimes below trick may be used to make the code that checks those values shorter:

bool status = true;
   
status &= foo_1();
status &= foo_2();
status &= foo_1();

printf(status ? "status: OK\n" : "status: NOK\n");

Injecting side effects by abusing comma operator

Comma operator can be used sometimes to inject side effects into expressions:

#include <stdio.h>
#include <stdlib.h>
#include <math.h>

int main() {
    int max = 10;
    double x = 0;

    while (max--, printf("%d\n", max), max) {
        /* sth */
    }

    x = printf("x: %f", x), x = sqrt(x), printf(", sqrt(x): %f\n", x), x;

    return EXIT_SUCCESS;
}

Zipf's law and natural languages

If we count the appearance of words in a sample of (most) human languages, it's visible that they have the Zipf's distribution. It can be used to distinguish human languages (and humans) from texts generated randomly (by spambots). This is presented on below histogram:

Zipf's law in natural languages

Below I will present tools that I made to verify this, first of them is a C++ program used to parse a text and generate a distribution of words that he encountered, second is a R script used to generate diagram from mentioned distribution.

How to distinguish human languages by letter frequency histogram?

How to find without dictionaries a language of a text sample? It can be accomplished by comparing frequencies of letters in a sample and in known languages. For example in polish 'a' letter is about 0.0551146 of all letters, in french it's 0.049458 and in german 0.0434701.

I created a small program in C++ that takes as an argument path to file with unknown language and print, how this language differs from languages that he knowns. The lowest result is the best match. Frequencies of letters in known languages are computed from files in samples directory.

Below is the output for checked sample and this sample (in French):

bash-3.2$ ./a.out test3.txt 
difference between Polish language: 0.0965482
difference between French language: 0.0442431
difference between German language: 0.0945827

A simple trick to avoid "goto" statement

Error handling in C is sometimes done by using goto and labels. One of examples in the Linux kernel:

static struct avc_node *avc_alloc_node(void)
{
    struct avc_node *node;

    node = kmem_cache_zalloc(avc_node_cachep, GFP_ATOMIC);
    if (!node)  
        goto out;

    INIT_RCU_HEAD(&node->rhead);
    INIT_HLIST_NODE(&node->list);
    avc_cache_stats_incr(allocations);

    if (atomic_inc_return(&avc_cache.active_nodes) > avc_cache_threshold)
        avc_reclaim_node();
   
out:
    return node;
}

There's a trick with the usage of do/while construction that allows to write the same without using goto label. The idea is presented on below:

// with goto label
if (!bar()) {
    goto error;
}
someValue = baz();
error:
// with do/while construction
do {
    if (!bar()) {
        break;
    }
    someValue = baz();
} while (0);